This page provides a
simple step by step instructions for starting the observatory, taking
images, shutting down the observatory, and emergency support
contacts.
Starting up the observatory
- Click on the Power
Control link
to bring up the power controller. Log onto the power controller and be
sure the power to the web camera is turned on. If not, turn on the web
camera. Also note the status of the Computers, Roof
Controller, Roof Interface, Cameras and
Scope. If the computers are off, power up the roof and instruments first, Next power up the computers. Now
wait for the cameras, scope, roof and computers to boot, if any have to
be turned
on. The computers take as much minute to boot. The web cameras will be
ready in about 30 seconds.
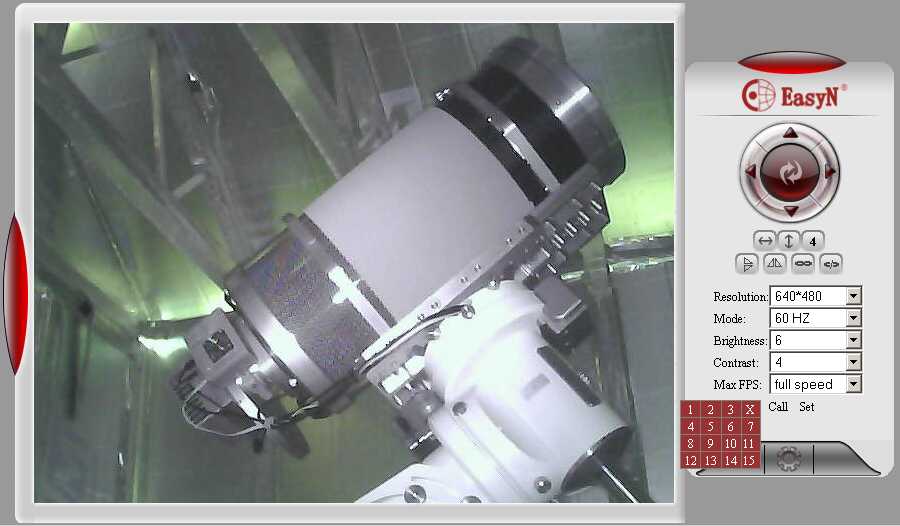
- Click on the Observatory
Web Camera
to view the status of the observatory. Once you log on with your
user code and password, you should select your browser type and then a
camera window similar to the one below should open.
It
is strongly recommended that you use Firefox as you web browser for
best results. Using the camera's pan a tilt controls, examine the state
of the observatory. Assure that the scope is in a reasonable position,
no cords are tangles and that all appears reasonable. If all is not
well STOP IMMEDIATELY
AND POWER OFF THE OBSERVATORY AND CONTACT A SYSTEMS ADMINISTRATOR.
- If the camera or telescope were not powered on when
you check the power controller earlier, click on the Power
Control link
to bring up the power controller. Log onto the power controller and
turn on the power to the scope and CCD cameras.
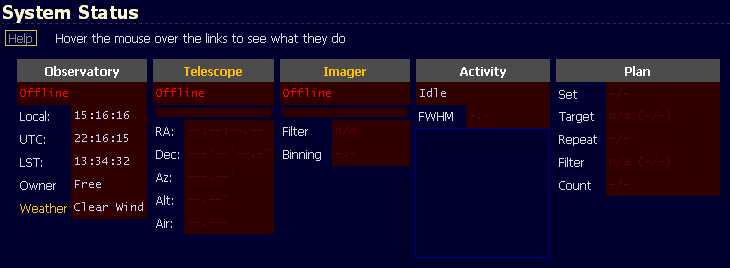
- Click on the Astronomer's
Control Panel link. This will bring you up to the ACP home
page. You will be asked to log in with your user code and assigned
password. Once the web page opens, check to see if the observatory is
already on line.
The image below shows what the observatory looks
like if it not on line.
If required,
click on the yellow Telescope
link to open the observatory, unpark the telescope and prepare for
imaging. The observatory may fail to open if weather conditions are
such that they prohibit opening. Such conditions include high winds,
high humidity, high dew point, or precipitation. In case the weather
prohibits imaging, please skip down to the shutdown section and shut
down the observatory in a orderly manner.If the imager is offline,
click on the Imager
link to bring the camera online.
- After the camera is online, you will see a Cooler line under
the imager, click this link and set the cooler temperature to -25C.
- Go back to the power Power
Control link
and turn off the observatory web camera. It has IR illuminatiors and
they will interfer with your imaging and observatories near
you.
The observatory is now open and ready to work.
Taking Images
 |
There are several ways to
take images remotely. This section covers the
two simplest methods for interactively making images. The simplest
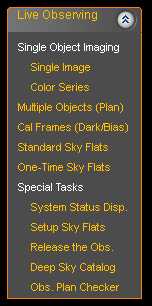
method for making an image is to used the Live Observing
control on the upper left of the ACP web page.
- Click on the Single Image link.
After a moment the following dialog will appear:
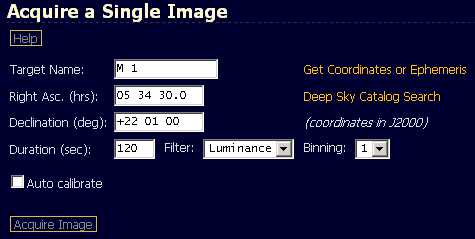
- Fill out the required information field. If
desired, you can have dark fields taken automatically by checking the Auto calibrate
box.
- When you are satisfied with you values, click
on Acquire image
the observatory will commence making your image, provided it is visible
and within the observatories limits.
|
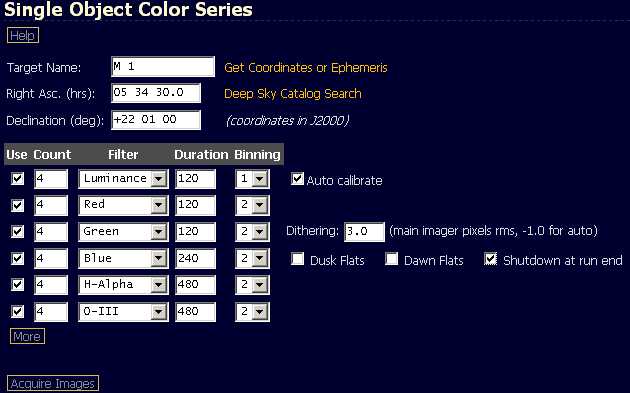
Similarly you can take a sequence of
images of an
object using multiple filters. To take a multi-filter image,
click on
Color Series.
The following dialog will appear:
This
command allows you to specify taking one or more images through each of
several filters. The expose time for each filter is separately
controllable. you may also specify different binning factorys for
each filter. Further advanced options include dithering between images
and shutting down automatically at the end of the run. This allows you
to fire off a long series of exposers and log off knowing that you can
log in and check your results later.
Shutting Down The
Observatory
To shut down the observatory
please perform the following steps:
- From the Astronomer's
Control Panel, click on the Cooler link in the
camera column. Warm up the camera slowly.
- Once the camera is at a safe temperature, click on
the Camera
header to put the camera to the "offline" state.
- Now click on the Telescope
header. The page should indicate that it is now shutting down the
observatory and closing the roof. This process can take a couple of
minutes, so be patient and wait until the page indicates completion.
- Now go to the Power
Control web page and turn on the web camera power.
- Go to the Observatory
Camera
page and check that the scope is properly parked and that the roof is
fully closed. If you have problems, please contact a systems
administrator.
- After verifying the observatory closed correctly, go
to the Power
Control web page and turn off the power on the web camera andscience cameras. Leave the telescope mount powered.
- The observatory is now shut down. You may exit all
the web pages.
Retrieving Your
Images
To download your images you will need an
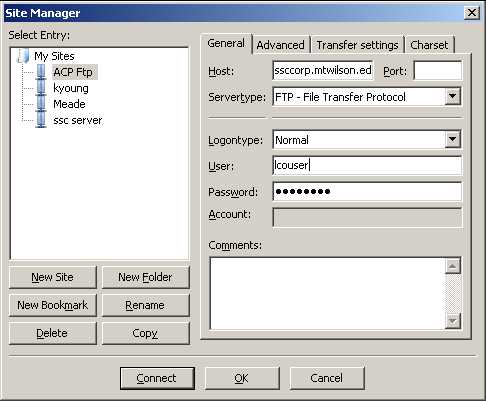
FTP client program. We recommend
Filezilla, a
free, multi-platform, open source FTP client. To retrieve your images,
connect to the observatories ip address:
139.229.103.190.
To create a permanent site profile in Filezilla, use the site
manager to create a profile similar to the on shown below:
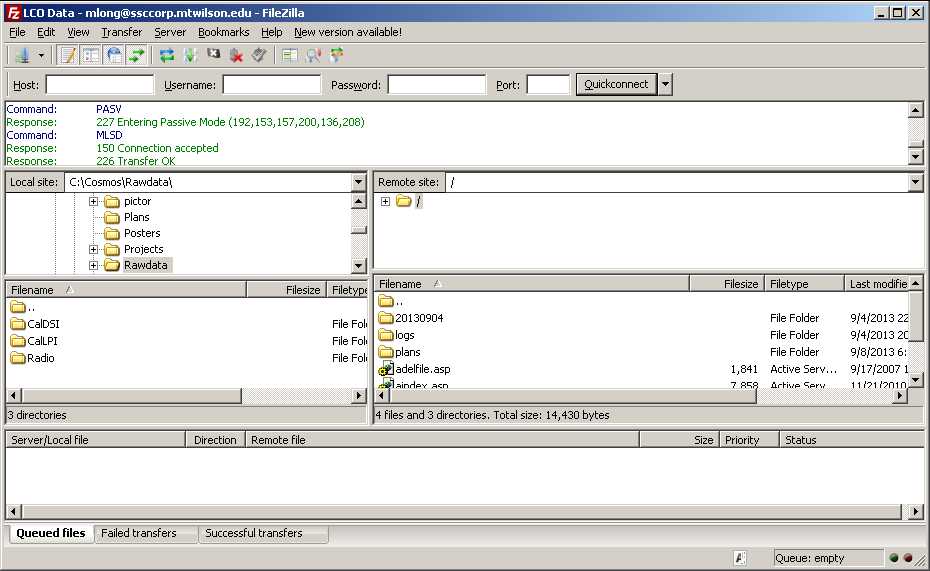
Once you click on connect, you will be logged onto the FTP client and a
window like the one below will appear.
The windows on the right are the files on the observatory server.
The left hand windows are the files on your PC. You can
transfer
individual files, or whole folders, by right clicking on them and
selecting
Download.
The
folders on the server root directory are named by the date of the
observation and contain zip compressed copys of your images.
There are also sub folders with the observing logs from each
night, and a plans folder where you may upload observing plans that you
have created offline.
When you have successfully downloaded
and backed up
your data on you own machine, please use the FTP Client to delete your
files. To delete a night's data, simply click on the folder and then
press the DEL key on your keyboard. The program will prompt you confirm
your deletion. File space on the observatory PC is limited and failure
to maintain enough free disk space on the servers will eventually cause
the observatory to stop operating.
For more details on observing plans see
the help files on the ACP web pages.